
Understanding how to share screen on teams in Microsoft Teams is a game-auto-changer for seamless communication and collaboration. Whether hosting a virtual meeting, delivering a presentation, or troubleshooting an issue, sharing your screen enhances clarity and booking. Instead of struggling with a verbal account, you can visually guide your hearing and make it easy for them to follow along. This feature is perfect for remote teams, bridging the gap between physical and practical workspaces. By sharing your sieve, you eliminate confusion, streamline words, and boost productivity in real time.
Best Time To Use Screen Sharing
Knowing when to share your screen can make your meetings more effective and interactive. Use screen sharing when presenting reports, training new team members, or walking through a complex task. It’s also invaluable for brainstorming sessions, inviting you to exhibit documents, mind single-valued functions, or real-time whiteboards. If you’re troubleshooting technical exits, sharing your projection screen lets IT support or co-workers reckon on the problem firsthand and leave to find quicker solutions.
Additionally, understanding how to share screen on teams is an outstanding for collaborative editing, ensuring everyone is aligned when working on slides, documents, or spreadsheets. Whether for efficiency or engagement, using screen sharing at the right time can transform how your team communicates.
How To Share Screen In Teams During A Meeting
To begin learning how to share screen on teams, simply join the Teams meeting via the link in your email invite. You can access it through a computer, mobile device, or web browser. Just make sure you’re using Chrome or the latest version of Edge if you’re on the web!
Locate The Share Icon After Joining Meeting
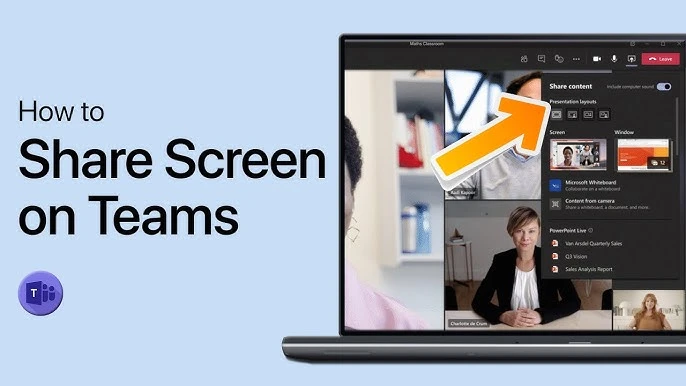
Once you’re in the meeting, wait for the shared image, which resembles a rectangle with an upward arrow. This is where you’ll click to begin portioning out your screen. On mobile, tap the three-dot carte and select the “Share” option.
Choose the Screen to Share During The Meeting
Now, you’ll be prompted with sharing options. You can select “Desktop” to share your entire screen with all windows open or choose a specific “Window” to share just one application. If you want your participants to hear sound, make sure to toggle the “Include computer sound” option.
Stop Sharing When You Done With Your Metting
When you’re finished sharing, click the “Stop Sharing” button. This will end the screen-sharing session, allowing you to return to your regular meeting view. Easy and effective!
Launching the Microsoft Teams Desktop App
Launch the Microsoft Teams application on your computer after understanding how to share screen on teams. You can find the app by searching your Start menu (Windows) or the Applications folder (Mac). Once opened, you’ll be ready to start screen sharing.
Navigate to the Chat You Want to Share
Next, go to the “Chat” tab key site in the vertical fare on the leftover side of meat. Select the chat where you want to share your screen. If you don’t let an survive Old World chat, you can start a new unity by clicking the “new chat” icon and adding your recipient(s).
Click the Share Icon In A Chat
In the chat window, look for the share icon, which looks like a rectangle with an upward arrow. Clicking this icon will allow you to choose which screen or window you’d like to share with the participants.
Select the Screen to Share Option
Once you click the share icon, you’ll have the choice to share your entire desktop or a specific window. If you want to limit what others see, select a particular window. If you want to share everything on your screen, select “Desktop” for a full-screen share.
Notify and Stop Sharing Your Screen
Participants will receive a notification to accept or reject the screen share when you begin sharing. Once they accept, they’ll see your screen. To stop sharing anytime, click the “Stop Sharing” button.

Precautions While Sharing Your Screen
After you learn how to share your screen on Teams and launch Protect Sensitive Information before sharing your screen in Microsoft Teams, close unnecessary tabs, turn off notifications and use Teams’ built-in privacy settings to control access. Always double-check what’s visible before presenting to avoid accidental data exposure.
Optimizing Performance for a Smooth Experience
For seamless screen sharing, ensure a stable internet connection and close unused applications to free up bandwidth. Adjust your display settings for clarity and use Teams’ “Window” sharing option to focus on specific content. A lag-free experience keeps your audience engaged and prevents disruptions.
Engaging Your Audience During a Presentation
Make your presentations interactive by annotating, highlighting key points, and asking questions. Keep slides visually appealing and avoid reading directly from them. Encourage discussions and use Teams’ chat and reactions to maintain engagement throughout your session.
Frequently Asked Questions
Do I Need A Unique App To Share My Screen In Teams?
You can use the Teams desktop client, mobile app, or web (Chrome/Edge recommended).
Is Screen Sharing Available On Mobile Devices?
Yes, you can share your screen on mobile by tapping the three-dot menu and selecting “Share.”
Can I Share My Screen In A Teams Chat?
Yes, open the chat, click the share icon, select your screen or window, and participants will be notified to accept.
Conclusion
Lastly, mastering how to share screen on teams can elevate your communication and collaboration efforts, puddle your get-together, and converse more actively and fat. Whether presenting complex data points, troubleshooting an issue, or working on a team project, screen sharing offers a seamless way to connect with others. By conforming to the best pattern for privacy, operation, and engagement, you can ensure that your blind-sharing sessions are political, effective, and impactful. Adopt this muscular feature article to heighten your virtual fundamental interaction and shit teamwork more efficient than ever!


